Web Development · DevSecOps
DevSecOps SBOMs in Practice — Our Exact Pipeline for Supply Chain Security in 2026
A step-by-step methodology for implementing Software Bill of Materials (SBOM) generation, dependency scanning, and vulnerability management in your CI/CD pipeline.

Anurag Verma
14 min read

Software supply chain attacks are not a theoretical threat anymore. The SolarWinds breach, the Log4Shell vulnerability, the xz utils backdoor — each one demonstrated that modern applications are only as secure as the weakest link in their dependency chain. In 2026, regulatory bodies have caught up with reality. The EU Cyber Resilience Act is in full enforcement, US Executive Order 14028 requirements are standard procurement language, and the question is no longer whether you need a Software Bill of Materials but how fast you can generate one.
This post shares our exact process for implementing SBOM generation, dependency scanning, and vulnerability management inside a CI/CD pipeline. Every configuration file, every workflow step, and every decision point is documented here so your team can adopt it directly.
Why SBOMs Matter Now
A Software Bill of Materials is a machine-readable inventory of every component — direct dependencies, transitive dependencies, operating system packages, container base image layers — that makes up a piece of software. Think of it as a nutritional label for your application.
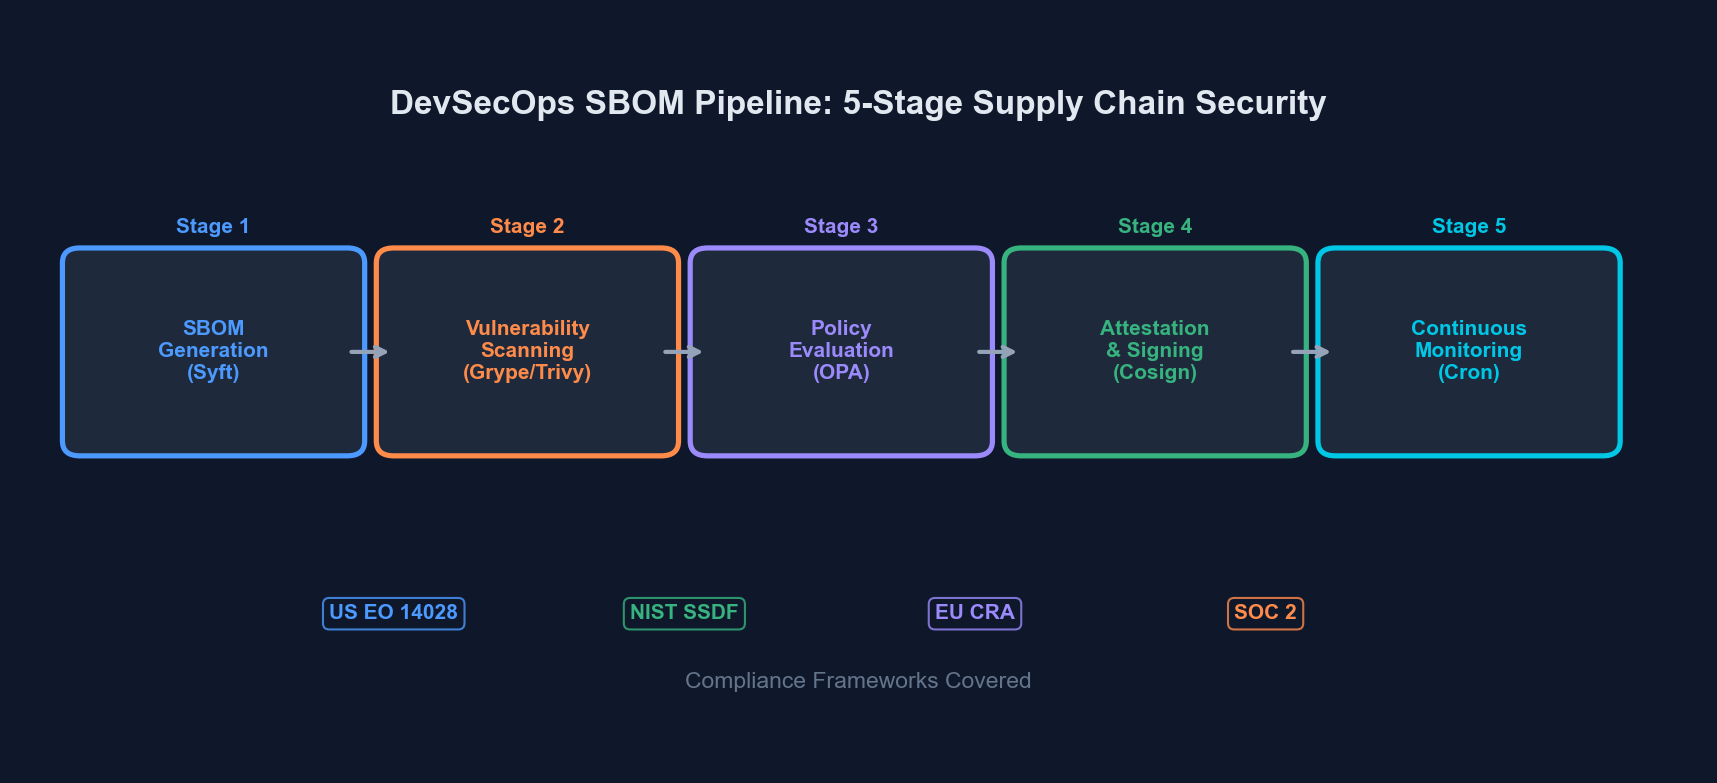 An SBOM pipeline integrates generation, scanning, and compliance validation into every build
Without an SBOM, you cannot answer basic security questions: What version of OpenSSL does our production container run? Do any of our transitive dependencies pull in a compromised package? Are we compliant with the license requirements of every library we ship?
SBOM Formats — CycloneDX vs SPDX
Before building a pipeline, you need to choose a format. The two dominant standards are CycloneDX and SPDX. Here is how they compare:
| Aspect | CycloneDX | SPDX |
|---|---|---|
| Maintained by | OWASP | Linux Foundation / ISO |
| ISO Standard | No (ECMA standard) | Yes (ISO/IEC 5962:2021) |
| Primary focus | Security and risk analysis | License compliance and security |
| Output formats | JSON, XML, Protobuf | JSON, RDF, YAML, XML, tag-value |
| VEX support | Native (built-in) | Via external linking |
| Tooling ecosystem | Syft, Trivy, cdxgen, CycloneDX CLI | Syft, Trivy, SPDX tools |
| Complexity | Lower — easier to generate and parse | Higher — richer metadata model |
| Best for | DevSecOps pipelines, vulnerability tracking | Regulatory compliance, license audits |
Our Recommendation
Use CycloneDX JSON as your primary format. It is easier to generate, easier to parse programmatically, has first-class VEX (Vulnerability Exploitability eXchange) support, and the tooling ecosystem is more mature for CI/CD integration. If a customer or regulatory body specifically requires SPDX, generate both — tools like Syft can output either format from the same scan.
The Pipeline — Step by Step
Our supply chain security pipeline has five stages. Each stage runs inside CI/CD (we use GitHub Actions, but the concepts transfer to GitLab CI, Jenkins, or any other system).
Stage 1: SBOM Generation
We use Syft from Anchore for SBOM generation. It handles container images, filesystem paths, and archive files with a single binary.
# Install Syft
curl -sSfL https://raw.githubusercontent.com/anchore/syft/main/install.sh | sh -s -- -b /usr/local/bin

# Generate SBOM from a container image
syft packages registry.example.com/myapp:latest \
  -o cyclonedx-json=sbom-container.cdx.json \
  -o spdx-json=sbom-container.spdx.json

# Generate SBOM from source directory (for application dependencies)
syft packages dir:. \
  -o cyclonedx-json=sbom-source.cdx.json
For Node.js projects, Syft reads package-lock.json or yarn.lock. For Python, it reads requirements.txt, Pipfile.lock, or poetry.lock. For Go, it reads go.sum. The key point: lock files must be committed to your repository.
Stage 2: Vulnerability Scanning
Once you have an SBOM, you scan it for known vulnerabilities. We run three scanners in parallel — not because we distrust any single one, but because their vulnerability databases differ and the overlap gives us higher confidence.
| Scanner | Database Source | Strengths | Run Time (typical) |
|---|---|---|---|
| Grype | Anchore feed (NVD, GitHub Advisories, OS distro DBs) | Fast, SBOM-native input, low false positives | 10–30s |
| Trivy | trivy-db (NVD, Red Hat, Debian, Alpine, GitHub, etc.) | Container + IaC + secret scanning in one tool | 15–45s |
| Snyk | Snyk vulnerability DB (proprietary + curated) | Best reachability analysis, fix PR suggestions | 20–60s |
# Scan the SBOM with Grype
grype sbom:sbom-container.cdx.json \
  --output json \
  --file grype-results.json \
  --fail-on critical

# Scan with Trivy (can consume SBOM or scan directly)
trivy sbom sbom-container.cdx.json \
  --format json \
  --output trivy-results.json \
  --severity CRITICAL,HIGH \
  --exit-code 1

# Scan with Snyk (direct project scan)
snyk test --json-file-output=snyk-results.json --severity-threshold=highStage 3: Policy Evaluation and Compliance Checks
Raw vulnerability counts are not enough. You need policies that encode your organization’s risk tolerance. We define policies in a YAML file checked into the repository:
# .security/sbom-policy.yaml
policies:
  vulnerability:
    fail_on_critical: true
    fail_on_high: true
    max_medium_count: 20
    max_low_count: 100
    grace_period_days:
      critical: 0
      high: 7
      medium: 30
      low: 90

  license:
    allowed:
      - MIT
      - Apache-2.0
      - BSD-2-Clause
      - BSD-3-Clause
      - ISC
      - CC0-1.0
    denied:
      - GPL-3.0-only
      - GPL-3.0-or-later
      - AGPL-3.0-only
      - AGPL-3.0-or-later
      - SSPL-1.0
    review_required:
      - LGPL-2.1-only
      - LGPL-3.0-only
      - MPL-2.0
      - EPL-2.0

  sbom:
    required_formats:
      - cyclonedx
    minimum_component_count: 10
    require_supplier_info: true
    require_hash_verification: true
This policy file does three things: enforces vulnerability thresholds with grace periods (so a newly-disclosed medium-severity CVE does not block your release at 3 AM), restricts copyleft licenses that are incompatible with your distribution model, and validates that the SBOM itself meets minimum quality standards.
Stage 4: SBOM Attestation and Storage
Generating an SBOM is pointless if you cannot prove it came from your pipeline and if you cannot retrieve it six months later during an audit. We use Cosign (from Sigstore) to attest and an OCI registry to store.
# Sign the container image
cosign sign --yes registry.example.com/myapp:latest

# Attach the SBOM as an attestation
cosign attest --yes \
  --predicate sbom-container.cdx.json \
  --type cyclonedx \
  registry.example.com/myapp:latest

# Verify the attestation later
cosign verify-attestation \
  --type cyclonedx \
  registry.example.com/myapp:latest
We also upload SBOMs to a dedicated S3 bucket organized by project/version/date/ for long-term retention. Regulatory requirements under the EU CRA mandate keeping SBOMs available for the lifetime of the product plus five years.
Stage 5: Continuous Monitoring
Your SBOM from build time is a snapshot. New CVEs are published daily. A container image that was clean on Tuesday might have three critical vulnerabilities by Friday.
We run a scheduled scan (cron job) that re-evaluates stored SBOMs against updated vulnerability databases every 12 hours:
# .github/workflows/sbom-continuous-monitoring.yml
name: SBOM Continuous Monitoring
on:
  schedule:
    - cron: '0 */12 * * *'
  workflow_dispatch:

jobs:
  rescan:
    runs-on: ubuntu-latest
    strategy:
      matrix:
        image:
          - registry.example.com/frontend:latest
          - registry.example.com/api:latest
          - registry.example.com/worker:latest
    steps:
      - name: Install scanners
        run: |
          curl -sSfL https://raw.githubusercontent.com/anchore/grype/main/install.sh | sh -s -- -b /usr/local/bin
          curl -sfL https://raw.githubusercontent.com/aquasecurity/trivy/main/contrib/install.sh | sh -s -- -b /usr/local/bin

      - name: Update vulnerability databases
        run: |
          grype db update
          trivy image --download-db-only

      - name: Extract SBOM from attestation
        run: |
          cosign verify-attestation \
            --type cyclonedx \
            ${{ matrix.image }} | \
            jq -r '.payload' | base64 -d | \
            jq '.predicate' > sbom.cdx.json

      - name: Scan SBOM
        run: |
          grype sbom:sbom.cdx.json \
            --output json \
            --file results.json

      - name: Evaluate and notify
        run: |
          CRITICAL=$(jq '[.matches[] | select(.vulnerability.severity == "Critical")] | length' results.json)
          HIGH=$(jq '[.matches[] | select(.vulnerability.severity == "High")] | length' results.json)
          if [ "$CRITICAL" -gt 0 ] || [ "$HIGH" -gt 0 ]; then
            echo "::error::Found $CRITICAL critical and $HIGH high vulnerabilities in ${{ matrix.image }}"
            # Send alert to Slack, PagerDuty, or your notification system
          fi
Continuous monitoring catches newly disclosed vulnerabilities in previously clean builds
The Complete GitHub Actions Workflow
Here is the full workflow that ties all five stages together. This runs on every push to main and on every pull request:
# .github/workflows/supply-chain-security.yml
name: Supply Chain Security
on:
  push:
    branches: [main]
  pull_request:
    branches: [main]

env:
  IMAGE: registry.example.com/myapp
  IMAGE_TAG: ${{ github.sha }}

jobs:
  build-and-secure:
    runs-on: ubuntu-latest
    permissions:
      contents: read
      id-token: write
      packages: write
      security-events: write

    steps:
      - uses: actions/checkout@v4

      - name: Build container image
        run: docker build -t $IMAGE:$IMAGE_TAG .

      - name: Push image to registry
        run: docker push $IMAGE:$IMAGE_TAG

      - name: Install security toolchain
        run: |
          curl -sSfL https://raw.githubusercontent.com/anchore/syft/main/install.sh | sh -s -- -b /usr/local/bin
          curl -sSfL https://raw.githubusercontent.com/anchore/grype/main/install.sh | sh -s -- -b /usr/local/bin
          curl -sfL https://raw.githubusercontent.com/aquasecurity/trivy/main/contrib/install.sh | sh -s -- -b /usr/local/bin
          cosign version || go install github.com/sigstore/cosign/v2/cmd/cosign@latest

      - name: Generate SBOM
        run: |
          syft packages $IMAGE:$IMAGE_TAG \
            -o cyclonedx-json=sbom.cdx.json \
            -o spdx-json=sbom.spdx.json

      - name: Scan with Grype
        run: |
          grype sbom:sbom.cdx.json \
            --output sarif \
            --file grype.sarif \
            --fail-on critical

      - name: Scan with Trivy
        run: |
          trivy sbom sbom.cdx.json \
            --format sarif \
            --output trivy.sarif \
            --severity CRITICAL,HIGH \
            --exit-code 1

      - name: Upload SARIF results
        if: always()
        uses: github/codeql-action/upload-sarif@v3
        with:
          sarif_file: grype.sarif

      - name: License compliance check
        run: |
          DENIED=$(jq -r '.components[] | select(.licenses) | .licenses[].license.id // empty' sbom.cdx.json | \
            grep -E "^(GPL-3|AGPL|SSPL)" || true)
          if [ -n "$DENIED" ]; then
            echo "::error::Denied licenses found: $DENIED"
            exit 1
          fi

      - name: Sign and attest (main branch only)
        if: github.ref == 'refs/heads/main'
        run: |
          cosign sign --yes $IMAGE:$IMAGE_TAG
          cosign attest --yes \
            --predicate sbom.cdx.json \
            --type cyclonedx \
            $IMAGE:$IMAGE_TAG

      - name: Archive SBOMs
        uses: actions/upload-artifact@v4
        with:
          name: sbom-artifacts
          path: |
            sbom.cdx.json
            sbom.spdx.json
          retention-days: 365
Vulnerability Management Workflow
Finding vulnerabilities is the easy part. Managing them is where most teams struggle. Here is our triage workflow.
Triage Process
Step 1: Automatic Classification. The scanner output is parsed and vulnerabilities are classified by severity and exploitability. We use EPSS (Exploit Prediction Scoring System) scores alongside CVSS to prioritize — a critical-severity CVE with a 0.1% EPSS score is less urgent than a high-severity CVE with a 40% EPSS score that has a known public exploit.
Step 2: Reachability Analysis. Not every vulnerability in your dependency tree is actually reachable from your code. Snyk and Grype both offer reachability analysis that traces whether your application actually calls the vulnerable function. This typically eliminates 30–50% of reported vulnerabilities from your immediate action queue.
Step 3: VEX Statements. For vulnerabilities that are not exploitable in your context (wrong OS, feature not enabled, mitigated by network configuration), create a VEX statement rather than suppressing the finding silently:
{
  "bomFormat": "CycloneDX",
  "specVersion": "1.6",
  "vulnerabilities": [
    {
      "id": "CVE-2025-12345",
      "analysis": {
        "state": "not_affected",
        "justification": "code_not_reachable",
        "detail": "The vulnerable function parseXML() is not invoked in our codebase. Verified by static analysis on 2026-02-28.",
        "response": ["will_not_fix"]
      },
      "affects": [
        {
          "ref": "pkg:npm/example-library@2.3.1"
        }
      ]
    }
  ]
}Step 4: Remediation Tracking. Exploitable vulnerabilities go into your issue tracker with SLA deadlines based on severity:
- Critical (CVSS 9.0+): 24-hour mitigation, 72-hour patch
- High (CVSS 7.0–8.9): 7-day patch
- Medium (CVSS 4.0–6.9): 30-day patch
- Low (CVSS 0.1–3.9): Next scheduled maintenance window
Compliance Checklist
If you need to demonstrate compliance to auditors, regulators, or enterprise customers, here is what your pipeline should produce:
For US Executive Order 14028 / NIST SSDF:
- SBOM in NTIA minimum elements format (supplier name, component name, version, unique identifier, dependency relationship, author, timestamp)
- Evidence of automated testing in CI/CD
- Vulnerability disclosure policy
- Patch management process documentation
For EU Cyber Resilience Act:
- SBOM for every product version shipped to EU market
- Continuous vulnerability monitoring (not just build-time)
- Coordinated vulnerability disclosure process
- Security updates available for product lifetime
- SBOM retention for product lifetime + 5 years
- Incident reporting to ENISA within 24 hours of active exploitation
Common Pitfalls and How We Avoid Them
Pitfall 1: Scanning only direct dependencies. Your package.json might list 30 packages. Your node_modules contains 1,200. Transitive dependencies are where most vulnerabilities hide. Syft and Trivy scan lock files by default, which captures the full tree — but only if lock files are committed and up to date.
Pitfall 2: Alert fatigue from false positives. Running three scanners in parallel generates noise. Deduplicate findings by CVE ID before creating tickets. Use VEX statements to permanently suppress known false positives instead of hitting “snooze” every sprint.
Pitfall 3: Treating SBOM generation as a one-time event. An SBOM is a snapshot. Your continuous monitoring cron job exists precisely because the vulnerability landscape changes daily. Build-time SBOMs answer “what did we ship?” Runtime monitoring answers “is what we shipped still safe?”
Pitfall 4: Ignoring container base image vulnerabilities. Your application code might be clean, but if you are running on node:18-bullseye and Debian Bullseye has 47 unpatched CVEs, those show up in your SBOM. Use minimal base images (node:18-alpine, distroless images) and rebuild regularly.
Pitfall 5: No process for zero-day response. When the next Log4Shell drops, you need to answer “are we affected?” in minutes, not days. With SBOMs stored and indexed, the query is trivial: search all SBOMs for the affected package and version range. Without SBOMs, you are opening Slack channels and asking developers to check manually.
Getting Started — The 30-Day Plan
Week 1: Install Syft and Grype locally. Run them against your main project. Review the output. Understand what is in your dependency tree. This step alone is usually eye-opening.
Week 2: Add SBOM generation to your CI pipeline. Do not add gates yet — just generate and archive. Get the team comfortable with the artifact and the tooling.
Week 3: Add vulnerability scanning with Grype or Trivy. Set --fail-on critical only. Triage the initial findings. Create VEX statements for false positives. Fix the real critical vulnerabilities.
Week 4: Add license compliance checks, SBOM attestation with Cosign, and the continuous monitoring cron job. Expand the severity gate to include high once the initial backlog is cleared. Document the triage process and assign ownership.
By the end of the month, you have a fully automated supply chain security pipeline that generates compliance artifacts, catches vulnerabilities before they reach production, and gives you a searchable inventory of every component in every version you have ever shipped.
Conclusion
Supply chain security is not a product you buy. It is a process you build into your existing CI/CD pipeline using open-source tools that are freely available today. The five-stage pipeline described here — generate, scan, evaluate, attest, monitor — takes a few days to implement and runs in under two minutes per build.
The regulatory landscape is only going to get stricter. The attack surface of the average application dependency tree is only going to get wider. Starting now means you are building muscle memory and institutional knowledge before compliance deadlines create pressure. The best time to implement SBOMs was two years ago. The second best time is this sprint.
More from this category
More from Web Development
 R.01
R.01 Node.js vs Deno vs Bun in 2026: The JavaScript Runtime Wars
 R.02
R.02 WASI 0.3 Arrives: Native Async Makes WebAssembly a Real Server-Side Contender
 R.03
R.03 Astro 6 Beta — CSP Nonces, Declarative Web Components, and Architecture Tradeoffs
The dispatch
Working notes from
the studio.
A short letter twice a month — what we shipped, what broke, and the AI tools earning their keep.
Discussion
Join the conversation.
Comments are powered by GitHub Discussions. Sign in with your GitHub account to leave a comment.