Web Development · Frameworks
Next.js 16 — Turbopack, React Compiler, and Cache Components: A Hands-On Migration Guide
Learn how to migrate to Next.js 16 with Turbopack as the default bundler, React Compiler integration, and cache components. Step-by-step guide with code examples.

Anurag Verma
13 min read

Next.js 16 is here, and it is the most significant release since the App Router landed in version 13. Turbopack is now the default bundler for both development and production builds. The React Compiler ships as a first-class integration. And a brand-new primitive called cache components changes how you think about data fetching and rendering performance.
If you are running Next.js 14 or 15 in production, this guide will walk you through every step of the migration — from updating dependencies to rewriting performance-critical patterns with the new APIs.
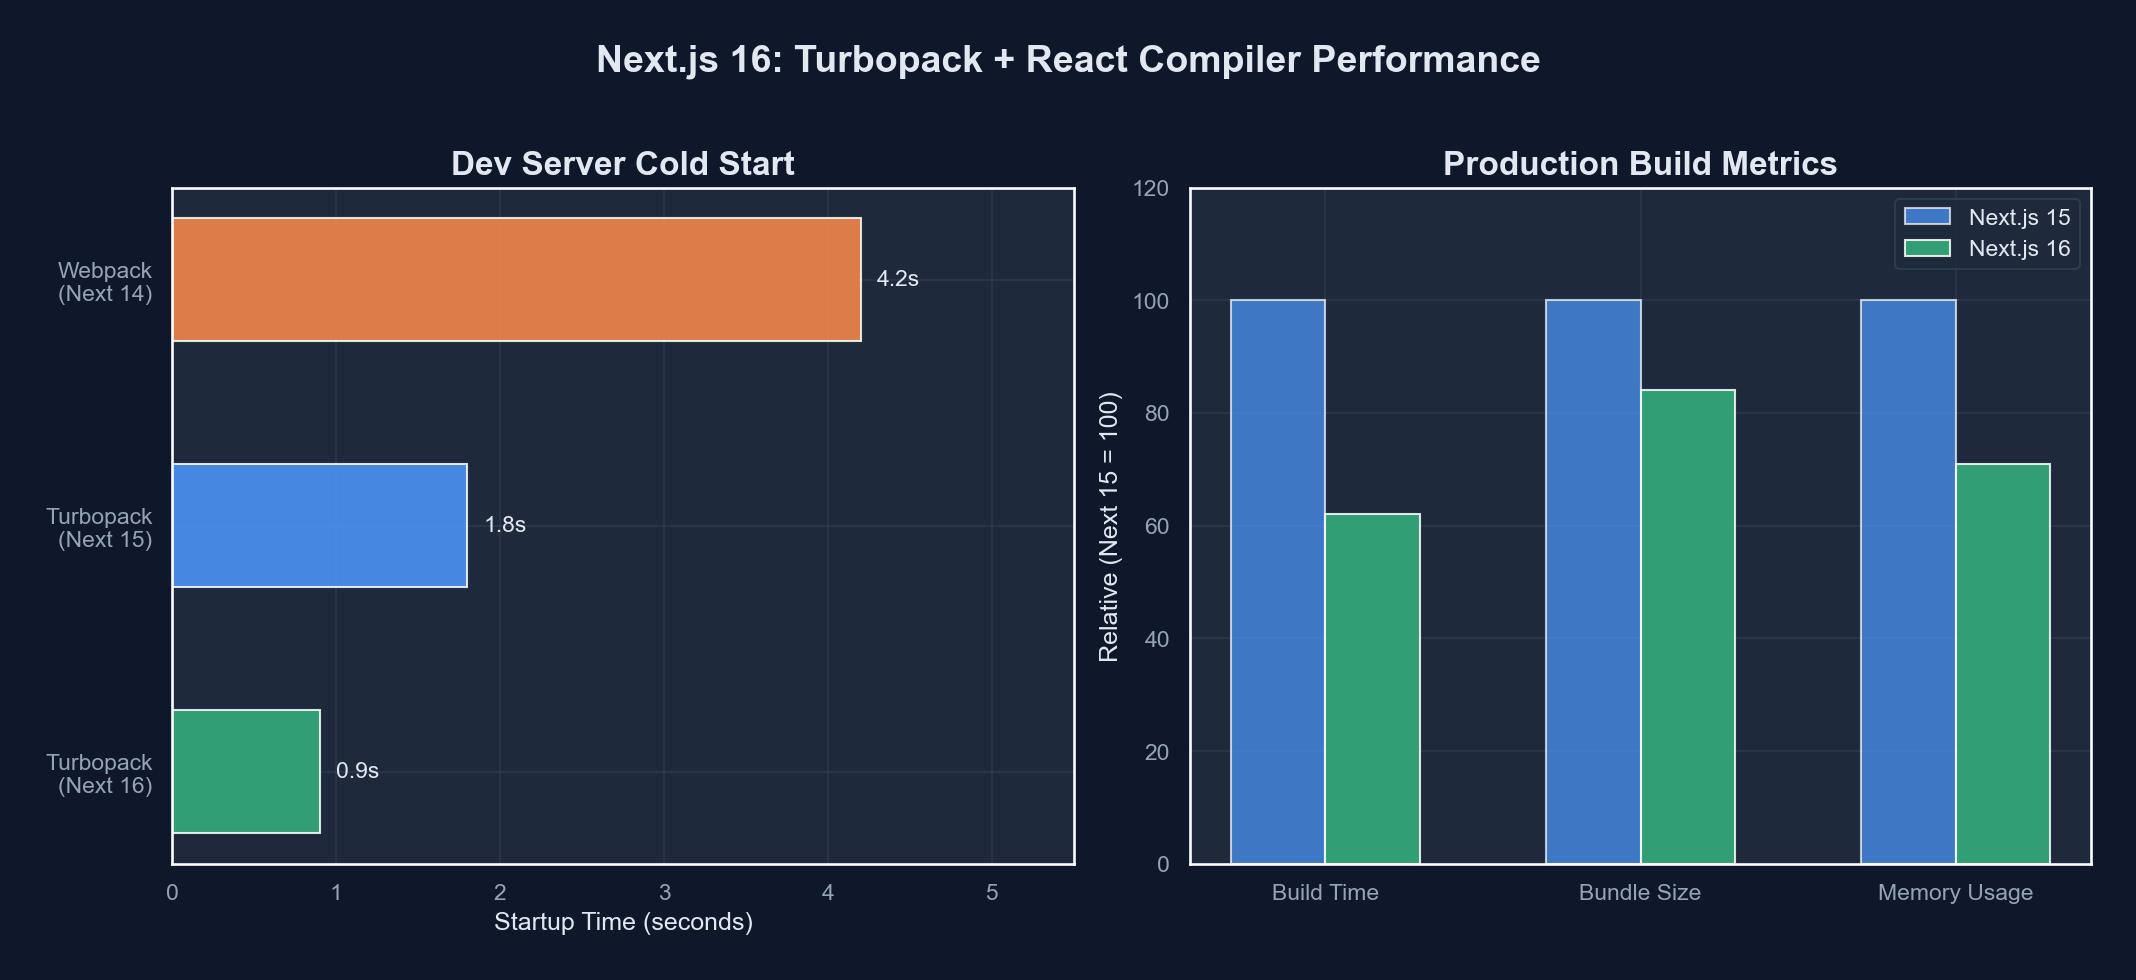 Next.js 16 introduces Turbopack as the default bundler alongside React Compiler and cache components
Prerequisites
Before you begin, make sure your environment meets these requirements:
- Node.js 20.11+ (Node 18 support has been dropped)
- React 19.1+ and React DOM 19.1+
- TypeScript 5.4+ (if you use TypeScript)
- A working Next.js 14 or 15 project to migrate
- Familiarity with the App Router (
app/directory)
Step 1: Upgrade Your Dependencies
Start by updating your core packages. Open your terminal in the project root and run:
npm install next@16 react@latest react-dom@latestIf you use TypeScript, also update the type definitions:
npm install -D @types/react@latest @types/react-dom@latestYour package.json should now look similar to this:
{
  "dependencies": {
    "next": "^16.0.0",
    "react": "^19.1.0",
    "react-dom": "^19.1.0"
  },
  "devDependencies": {
    "@types/react": "^19.1.0",
    "@types/react-dom": "^19.1.0",
    "typescript": "^5.4.0"
  }
}
Run npm run dev to confirm the development server starts. You should see a new log line confirming Turbopack is active:
▲ Next.js 16.0.0
- Local:    http://localhost:3000
- Turbopack (default)

✓ Ready in 320msStep 2: Turbopack as the Default Bundler
In Next.js 15, Turbopack was opt-in via the --turbopack flag. In Next.js 16, it is the default for both next dev and next build. webpack is still available as an opt-out escape hatch, but it is now considered legacy.
What Changes for You
Most projects will see immediate improvements without any code changes:
| Metric | webpack (Next.js 15) | Turbopack (Next.js 16) | Improvement |
|---|---|---|---|
| Cold start (dev) | ~3.2s | ~0.9s | 3.5x faster |
| Hot Module Reload | ~220ms | ~12ms | 18x faster |
| Production build (medium app) | ~48s | ~18s | 2.7x faster |
| Memory usage (dev) | ~1.2 GB | ~380 MB | 68% less |
Handling Custom webpack Configuration
If your next.config.js uses a custom webpack function, you have two options.
Option A: Migrate to Turbopack configuration. Turbopack exposes its own configuration surface under turbopack in next.config.js:
// next.config.ts
import type { NextConfig } from 'next';

const nextConfig: NextConfig = {
  turbopack: {
    rules: {
      '*.svg': {
        loaders: ['@svgr/webpack'],
        as: '*.js',
      },
    },
    resolveAlias: {
      // Replace a module with a custom implementation
      'old-library': 'new-library',
    },
  },
};

export default nextConfig;
Option B: Fall back to webpack temporarily. Add the --webpack flag to your dev and build scripts:
{
  "scripts": {
    "dev": "next dev --webpack",
    "build": "next build --webpack"
  }
}Verifying Turbopack Compatibility
Next.js 16 ships with a compatibility checker. Run it to get a detailed report of any issues:
npx next turbopack-compatThis command scans your project and produces a report like:
✓ 127 modules compatible
⚠ 3 modules need attention:
  - next-mdx-remote: Update to v5.1+ for Turbopack support
  - @vanilla-extract/next-plugin: Use turbopack.rules instead
  - custom-webpack-loader: No Turbopack equivalent found
Address each warning before removing the --webpack flag from your scripts.
Step 3: Enable the React Compiler
The React Compiler (formerly React Forget) is now a stable, first-class integration in Next.js 16. It automatically memoizes your components, hooks, and expressions — eliminating the need for manual useMemo, useCallback, and React.memo in most cases.
Installation
Install the compiler plugin:
npm install -D babel-plugin-react-compilerThen enable it in your Next.js config:
// next.config.ts
import type { NextConfig } from 'next';

const nextConfig: NextConfig = {
  experimental: {
    reactCompiler: true,
  },
};

export default nextConfig;
What the Compiler Does
Consider this component that you might write today:
'use client';

import { useState, useMemo, useCallback } from 'react';

interface Product {
  id: string;
  name: string;
  price: number;
  category: string;
}

function ProductList({ products, taxRate }: {
  products: Product[];
  taxRate: number;
}) {
  const [filter, setFilter] = useState('');

  const filtered = useMemo(
    () => products.filter(p =>
      p.name.toLowerCase().includes(filter.toLowerCase())
    ),
    [products, filter]
  );

  const totalWithTax = useMemo(
    () => filtered.reduce((sum, p) => sum + p.price, 0) * (1 + taxRate),
    [filtered, taxRate]
  );

  const handleFilter = useCallback(
    (e: React.ChangeEvent<HTMLInputElement>) => {
      setFilter(e.target.value);
    },
    []
  );

  return (
    <div>
      <input onChange={handleFilter} value={filter} placeholder="Search..." />
      <p>Total (with tax): ${totalWithTax.toFixed(2)}</p>
      {filtered.map(p => (
        <ProductCard key={p.id} product={p} />
      ))}
    </div>
  );
}
With the React Compiler enabled, you write the same logic without any manual memoization:
'use client';

import { useState } from 'react';

interface Product {
  id: string;
  name: string;
  price: number;
  category: string;
}

function ProductList({ products, taxRate }: {
  products: Product[];
  taxRate: number;
}) {
  const [filter, setFilter] = useState('');

  const filtered = products.filter(p =>
    p.name.toLowerCase().includes(filter.toLowerCase())
  );

  const totalWithTax = filtered.reduce(
    (sum, p) => sum + p.price, 0
  ) * (1 + taxRate);

  return (
    <div>
      <input
        onChange={(e) => setFilter(e.target.value)}
        value={filter}
        placeholder="Search..."
      />
      <p>Total (with tax): ${totalWithTax.toFixed(2)}</p>
      {filtered.map(p => (
        <ProductCard key={p.id} product={p} />
      ))}
    </div>
  );
}
The compiler analyzes the data flow at build time and inserts memoization automatically. The result is identical runtime behavior with cleaner source code.
Gradual Adoption
If you want to enable the compiler on specific files first, use the compilationMode option:
// next.config.ts
const nextConfig: NextConfig = {
  experimental: {
    reactCompiler: {
      compilationMode: 'annotation',
    },
  },
};
Then add the 'use memo' directive to individual files:
'use memo';
'use client';

function ExpensiveComponent() {
  // This file will be compiled with React Compiler
}
Step 4: Cache Components
Cache components are the headline feature of Next.js 16. They introduce a new rendering primitive that sits between server components and client components. A cache component renders once per unique set of props and is then cached at the edge — across all users and requests.
How Cache Components Work
A cache component is declared with the 'use cache' directive:
'use cache';

interface WeatherProps {
  city: string;
}

async function WeatherWidget({ city }: WeatherProps) {
  const data = await fetch(
    `https://api.weather.example/v1/current?city=${city}`
  );
  const weather = await data.json();

  return (
    <div className="weather-widget">
      <h3>{city}</h3>
      <p>{weather.temperature}°C — {weather.description}</p>
      <p>Humidity: {weather.humidity}%</p>
    </div>
  );
}

export default WeatherWidget;
This component fetches weather data and renders HTML. The first time it runs for city="London", the output is cached. Every subsequent request for city="London" — from any user, on any edge node — serves the cached HTML instantly without re-fetching or re-rendering.
Cache Lifetimes and Revalidation
You control cache behavior with the cacheLife function:
'use cache';

import { cacheLife } from 'next/cache';

async function PricingTable() {
  cacheLife('hours');

  const plans = await fetch('https://api.example.com/plans');
  const data = await plans.json();

  return (
    <table>
      <thead>
        <tr>
          <th>Plan</th>
          <th>Price</th>
          <th>Features</th>
        </tr>
      </thead>
      <tbody>
        {data.map((plan: any) => (
          <tr key={plan.id}>
            <td>{plan.name}</td>
            <td>${plan.price}/mo</td>
            <td>{plan.features.join(', ')}</td>
          </tr>
        ))}
      </tbody>
    </table>
  );
}
The available cache lifetime presets are:
| Preset | Duration | Use Case |
|---|---|---|
'seconds' | 60 seconds | Real-time dashboards, live scores |
'minutes' | 5 minutes | Social feeds, notifications |
'hours' | 1 hour | Pricing pages, product catalogs |
'days' | 1 day | Blog posts, documentation |
'weeks' | 1 week | Static marketing content |
'max' | 1 year | Immutable assets, versioned content |
You can also define custom profiles in next.config.ts:
// next.config.ts
const nextConfig: NextConfig = {
  cacheLife: {
    'product-catalog': {
      stale: 3600,    // Serve stale for 1 hour
      revalidate: 900, // Revalidate every 15 minutes
      expire: 86400,   // Expire after 1 day
    },
  },
};
Then reference your custom profile:
'use cache';

import { cacheLife } from 'next/cache';

async function ProductCatalog() {
  cacheLife('product-catalog');
  // ...
}
Cache Tags for On-Demand Revalidation
Tag your cached components so you can invalidate them precisely:
'use cache';

import { cacheLife, cacheTag } from 'next/cache';

async function BlogPost({ slug }: { slug: string }) {
  cacheLife('days');
  cacheTag(`blog-${slug}`, 'blog');

  const post = await fetch(`https://api.example.com/posts/${slug}`);
  const data = await post.json();

  return (
    <article>
      <h1>{data.title}</h1>
      <div dangerouslySetInnerHTML={{ __html: data.html }} />
    </article>
  );
}
When a post is updated, revalidate it from a server action or API route:
'use server';

import { revalidateTag } from 'next/cache';

export async function publishPost(slug: string) {
  await db.posts.update(slug, { status: 'published' });

  // Invalidate just this post
  revalidateTag(`blog-${slug}`);

  // Or invalidate all blog posts
  // revalidateTag('blog');
}
Cache components sit between server and client components in the rendering pipeline
Step 5: New Routing Features
Next.js 16 introduces several routing improvements that simplify common patterns.
Parallel Route Groups
You can now define parallel routes that load simultaneously and resolve independently:
// app/dashboard/layout.tsx
export default function DashboardLayout({
  children,
  analytics,
  notifications,
}: {
  children: React.ReactNode;
  analytics: React.ReactNode;
  notifications: React.ReactNode;
}) {
  return (
    <div className="dashboard">
      <main>{children}</main>
      <aside>
        {analytics}
        {notifications}
      </aside>
    </div>
  );
}
// app/dashboard/@analytics/page.tsx
'use cache';
import { cacheLife } from 'next/cache';
export default async function AnalyticsPanel() {
cacheLife('minutes');
const stats = await fetch('https://api.example.com/analytics');
const data = await stats.json();
return (
<div className="analytics-panel">
<h3>Analytics</h3>
<p>Visitors today: {data.visitors}</p>
<p>Conversion rate: {data.conversionRate}%</p>
</div>
);
}Each parallel route can have its own cache lifetime, loading state, and error boundary.
Type-Safe Route Parameters
Next.js 16 generates route parameter types automatically. After running next dev or next build, you get a .next/types directory with route definitions:
// app/blog/[slug]/page.tsx
// TypeScript knows `params.slug` is a string
export default async function BlogPage({
  params,
}: {
  params: Promise<{ slug: string }>;
}) {
  const { slug } = await params;
  // ...
}Step 6: Performance Profiling
Next.js 16 ships with a built-in performance profiler that works with Turbopack. Run your development server with the --profile flag:
next dev --profileThis opens a performance panel at http://localhost:3000/__next/profile where you can see:
- Component render times (with React Compiler optimizations highlighted)
- Cache hit/miss rates for cache components
- Turbopack module compilation times
- Client-side hydration performance
Use this tool to identify components that would benefit most from the 'use cache' directive or React Compiler optimizations.
Step 7: Migration Checklist
Here is a condensed checklist to guide your migration from Next.js 15 to 16:
# 1. Update dependencies
npm install next@16 react@latest react-dom@latest

# 2. Run the compatibility checker
npx next turbopack-compat

# 3. Fix any Turbopack incompatibilities
# 4. Start dev server and verify basic functionality
npm run dev

# 5. Enable React Compiler (optional but recommended)
# Add reactCompiler: true to next.config.ts

# 6. Install compiler plugin
npm install -D babel-plugin-react-compiler

# 7. Remove manual useMemo/useCallback where appropriate

# 8. Identify components that benefit from caching
# Add 'use cache' directive to data-heavy server components

# 9. Run production build
npm run build

# 10. Profile and optimize
next build --profileCommon Migration Issues and Fixes
Here are the problems you are most likely to encounter during migration and how to solve them.
Issue: Module not found errors with custom webpack loaders.
The custom loader is not compatible with Turbopack. Check the Turbopack loader compatibility list and migrate to a supported loader, or use turbopack.rules in your config.
Issue: useMemo behaves differently with React Compiler.
The compiler may optimize memoization differently than your manual implementation. If you see unexpected re-renders, add the 'use no memo' directive to that specific file to opt out:
'use no memo';

// This file will not be processed by React Compiler
function LegacyComponent() {
  // Keep manual useMemo/useCallback here
}
Issue: params is now a Promise.
In Next.js 16 (continuing from 15), dynamic route parameters are async. Update your page components:
// Before (Next.js 14)
export default function Page({ params }: { params: { id: string } }) {
  const id = params.id;
}

// After (Next.js 16)
export default async function Page({
  params,
}: {
  params: Promise<{ id: string }>;
}) {
  const { id } = await params;
}
Issue: Third-party packages with "use client" boundaries breaking cache components.
Cache components cannot import client components directly. Wrap client components at the boundary:
'use cache';

import ClientWidget from './ClientWidget'; // This is a 'use client' component

export default async function CachedPage() {
  const data = await fetchData();

  return (
    <div>
      <h1>{data.title}</h1>
      {/* Client component receives serializable props */}
      <ClientWidget initialData={data.widgetConfig} />
    </div>
  );
}
Wrapping Up
Next.js 16 represents a major step forward in developer experience and runtime performance. Turbopack slashes build times and memory usage. The React Compiler eliminates an entire category of performance boilerplate. And cache components give you fine-grained, edge-aware caching without reaching for external tools.
The best part is that you can adopt these features incrementally. Turbopack works out of the box for most projects. The React Compiler can be enabled per-file. Cache components are additive — you sprinkle them where they matter most.
Start with the dependency upgrade, run the compatibility checker, and work through the issues one at a time. Your users will notice the difference even if they never see a single line of your code.
More from this category
More from Web Development
 R.01
R.01 Node.js vs Deno vs Bun in 2026: The JavaScript Runtime Wars
 R.02
R.02 WASI 0.3 Arrives: Native Async Makes WebAssembly a Real Server-Side Contender
 R.03
R.03 Astro 6 Beta — CSP Nonces, Declarative Web Components, and Architecture Tradeoffs
The dispatch
Working notes from
the studio.
A short letter twice a month — what we shipped, what broke, and the AI tools earning their keep.
Discussion
Join the conversation.
Comments are powered by GitHub Discussions. Sign in with your GitHub account to leave a comment.